Now Corel ships with a truckload of bundled goodies that offer us creatives great value. Some are well hidden. Head of design and strategy at MSD Mo Jogie provides a detailed breakdown of Aftershot 3 HDR. This article appears in Sign Africa Journal.

The Corel Welcome screen will allow you to install your Aftershot 3 HDR software.
Corel Aftershot 3 HDR is a non-destructive, RAW photo management and editing tool that will have you pushing pixels faster than Buck Rogers. Filter and sort your best shots quickly and efficiently. Batch process effects and merge bracketed shots using the HDR functionality. Then present to your client in a professional slideshow or high quality print. So, whether you’re a designer, photographer, signage pro, printer, or all of the above, you may want to give Corel Aftershot 3 HDR a whirl.
Based on my experience, many DRAW! users are not aware of Aftershot. So let’s have a quick convo about it. If you work with RAW photos already, good job! Joking aside, you can skip the next few paragraphs. What is Aftershot 3 HDR and is it really free with CorelDRAW! 2019? Affirmative to that Charlie. Full disclosure: there is the Pro version, which will cost you about R500. We’re going to focus on the free bundled version. Simply put, it makes it very, very difficult to muck up your photos. It also means that you can make adjustments to photos if they are under or overexposed, correct lens distortions, etc. If you are using a DSLR camera to capture your shots, capture in RAW. It’s cholesterol-free. Aftershot can handle JPEG and TIFF file formats too. These formats won’t have all the camera metadata. It’s great to know you can still work on your legacy photographs.

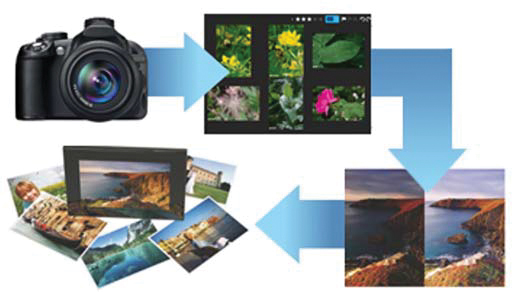
The RAW workflow is a four-step process from capture on your camera, to sorting, to applying corrections, to output. What is the use case for such a tool, you ask? If you’re dealing with large repositories of photos, and you need to process quickly and consistently, this is the tool for you.
You will need to install the software. To do this, click the Get More tab on the CorelDRAW! Welcome screen. Scroll through the list, find Aftershot and click download. Once downloaded, launch the installer and follow the on-screen instructions.

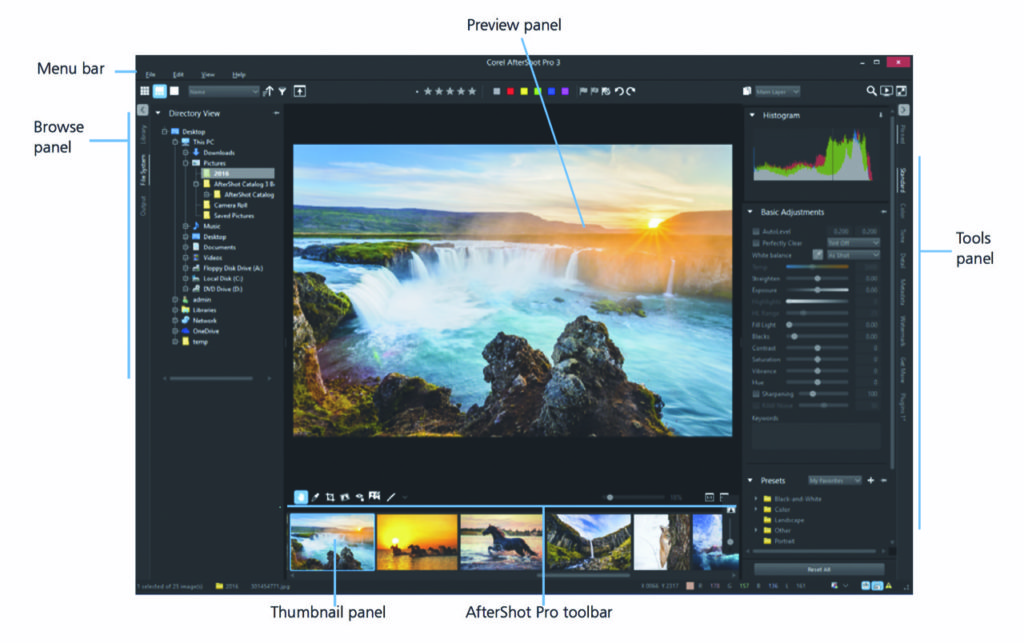
Now that we’re past the orientation bit, let’s chat a little about the interface and how you’ll be navigating the Aftershot universe like a pro. I won’t state the obvious like menus, etc. The browse panel to the left of the interface is where you will be importing and exporting your images when you are ready to print them, or export them for websites, electronic signs and the like.
The preview panel in the window, I’m sure you’ve worked out, is the main previewing space for your photos. You can choose and navigate your photo libraries in a rich, visual way through the thumbnail panel at the bottom of the screen.

The toolbar appears just above the thumbnail panel in a horizontal orientation, which is typical of this genre of software. This is where you can choose tools to crop, fix blemishes on photos, correct exposure and a ton more.
The panels on the right will allow you to make edits from exquisite black and whites to fixing shots that may be too dark or light. For quick colour adjustments consider using the Autolevel and Perfectly Clear tickboxes found in the Basic Adjustments panel, found to the right of your Aftershot interface.
These options are great for applying corrections to many photos at once without having to open each one. For example, you may have a school yearbook shoot, photos of a company board, or shots of a signage or design installation, to mention a few possibilities. Simply edit one image. Then copy and paste the image properties to the rest of the images.
Whether it is 2, 200 or 2000, same drill. One edit, one copy, one paste. You’re done. Aftershot HDR is sure to help you meet those crushing deadlines and have a bit of fun editing too. Take it for a test drive and let us know what you think. Happy pixel pushing.
MSD (+27 11) 782 4297 mo@imsd.co.za www.imsd.co.za


